Linux Inside Windows: A Friendly WSL Guide for Security Folks
What WSL is, WSL 1 vs 2, installing Kali, the networking trap that breaks reverse shells, and small tweaks that make daily work easier.
Not long ago, a security person on Windows had two choices: split the laptop in two and reboot every time (dual boot), or live with a virtual machine that eats a few GB of RAM and takes ages to start. WSL (Windows Subsystem for Linux) opened a third way: run Linux inside Windows, as easily as opening an app.
In this post I cover what WSL is, how to get Kali running in a few minutes and, most importantly, the networking trap that costs people hours during pentests. The terminal output in the images comes from my own machine.
So what exactly is WSL?
In short: the official way to really run Linux programs on Windows. There are two versions, and the difference decides what will and will not work:
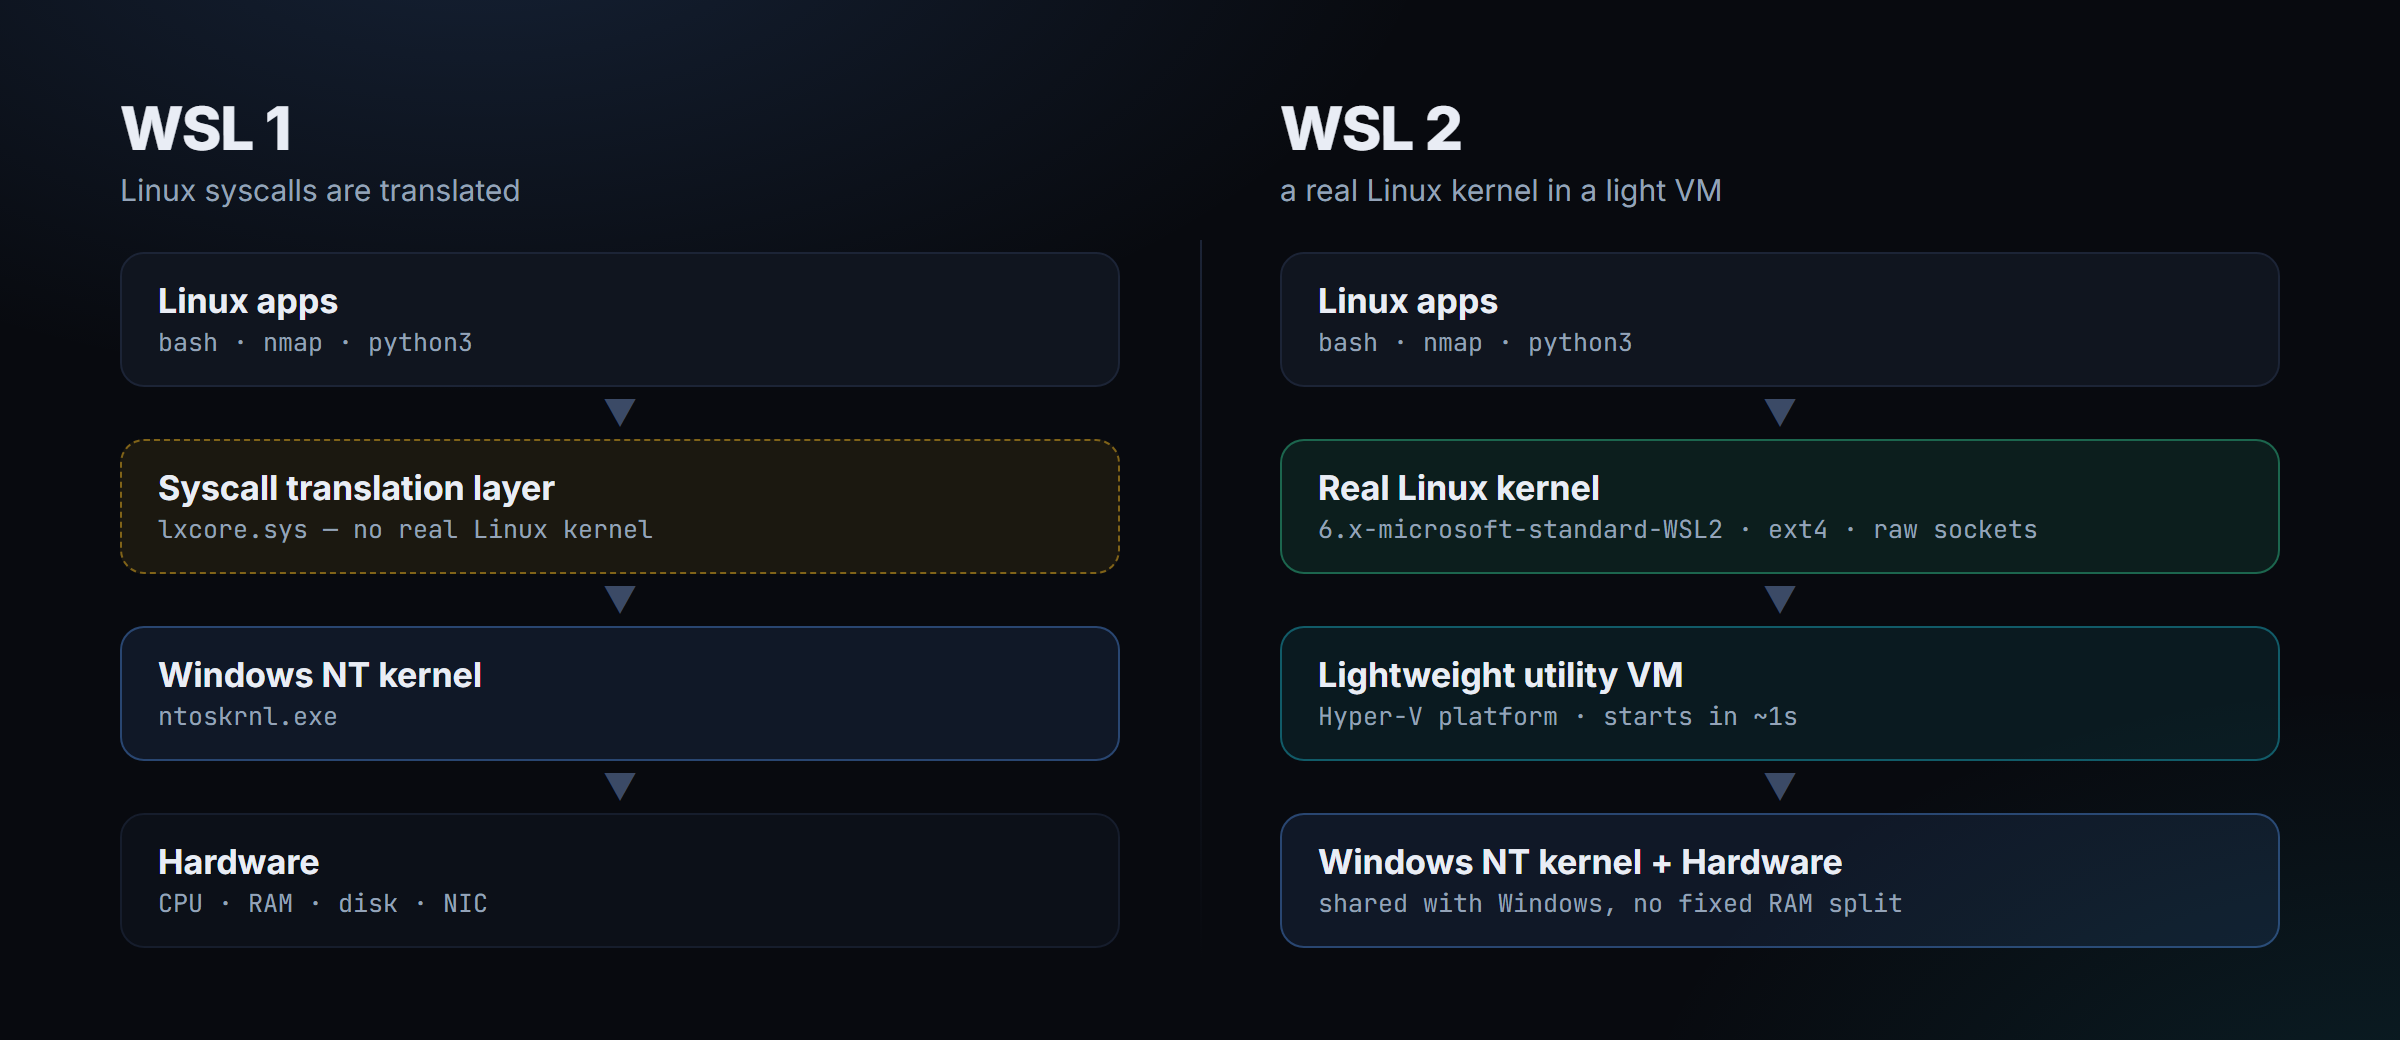
- WSL 1 is a layer that translates Linux system calls for the Windows kernel. There is no real Linux kernel, so low-level work such as raw sockets is limited.
- WSL 2 runs a real Linux kernel in a lightweight VM on the Hyper-V platform that starts in about a second. SYN scans with
sudo nmap -sS, Docker and tools that need kernel features work here.
For security work the answer is clear: WSL 2. Today wsl --install installs it by default anyway.
Installing it in 5 minutes
An administrator PowerShell is all you need:
# Install WSL (the first run may ask for a reboot)
wsl --install

# See the available distributions, add Kali
wsl --list --online
wsl --install -d kali-linux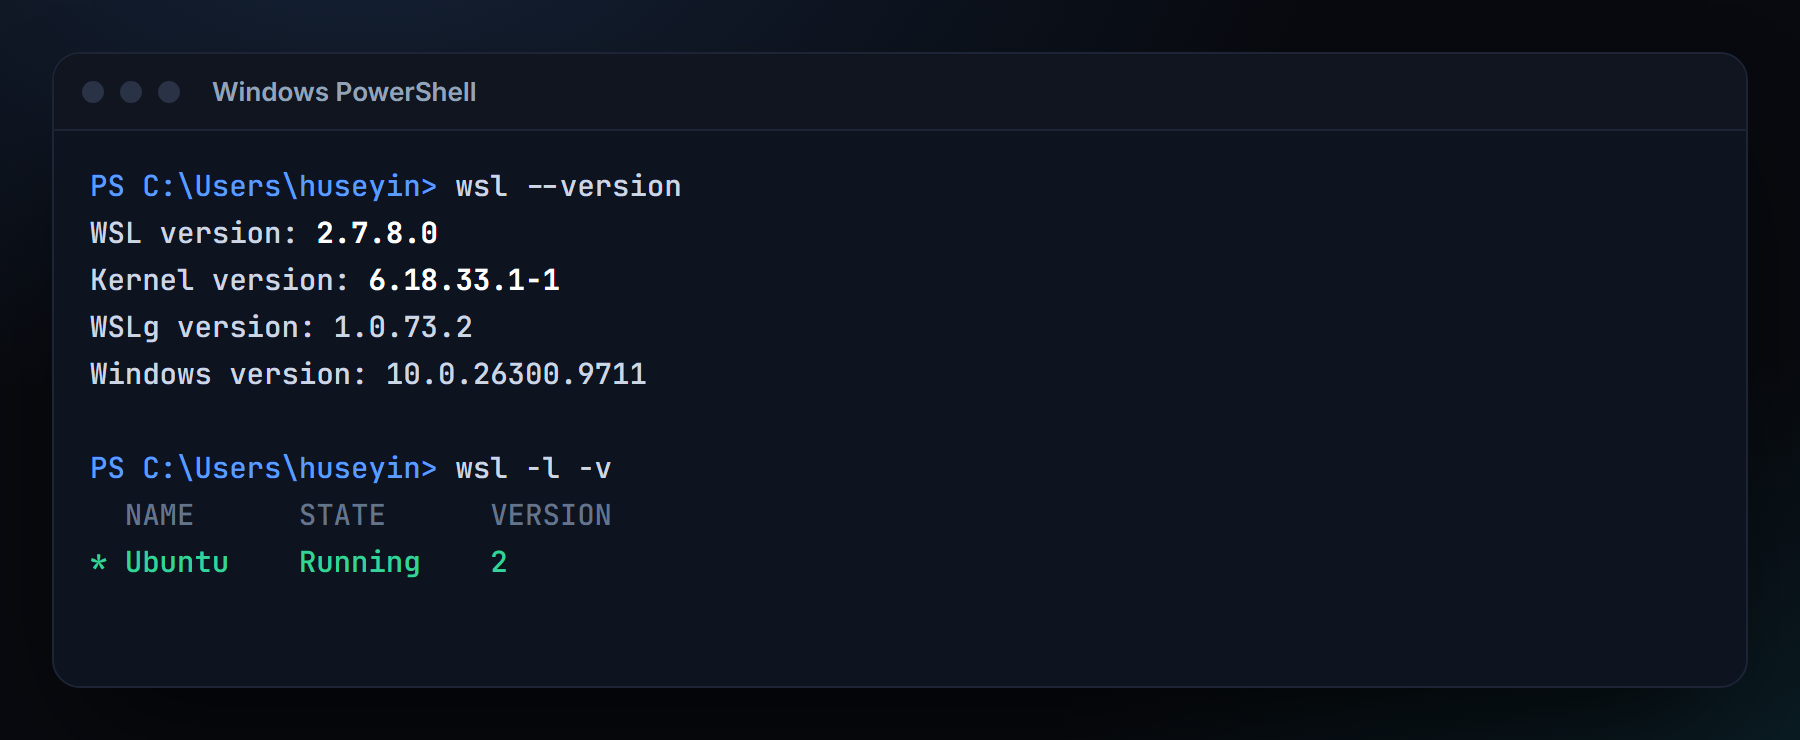
wsl -l -v output means the distribution runs on the real kernel.Kali on WSL comes almost empty; you pick the tools. For the classic toolset:
sudo apt update && sudo apt full-upgrade -y
sudo apt install -y kali-linux-default     # nmap, burp, impacket, metasploit...
# or something lighter:
sudo apt install -y kali-linux-headless
GUI tools (Burp, Wireshark) need nothing extra: thanks to WSLg on Windows 11, Linux windows open on the Windows desktop like normal apps. If you want a full Kali desktop, run sudo apt install -y kali-win-kex and then kex --win -s.
What life looks like inside
The sweetest part: the two worlds can see each other.
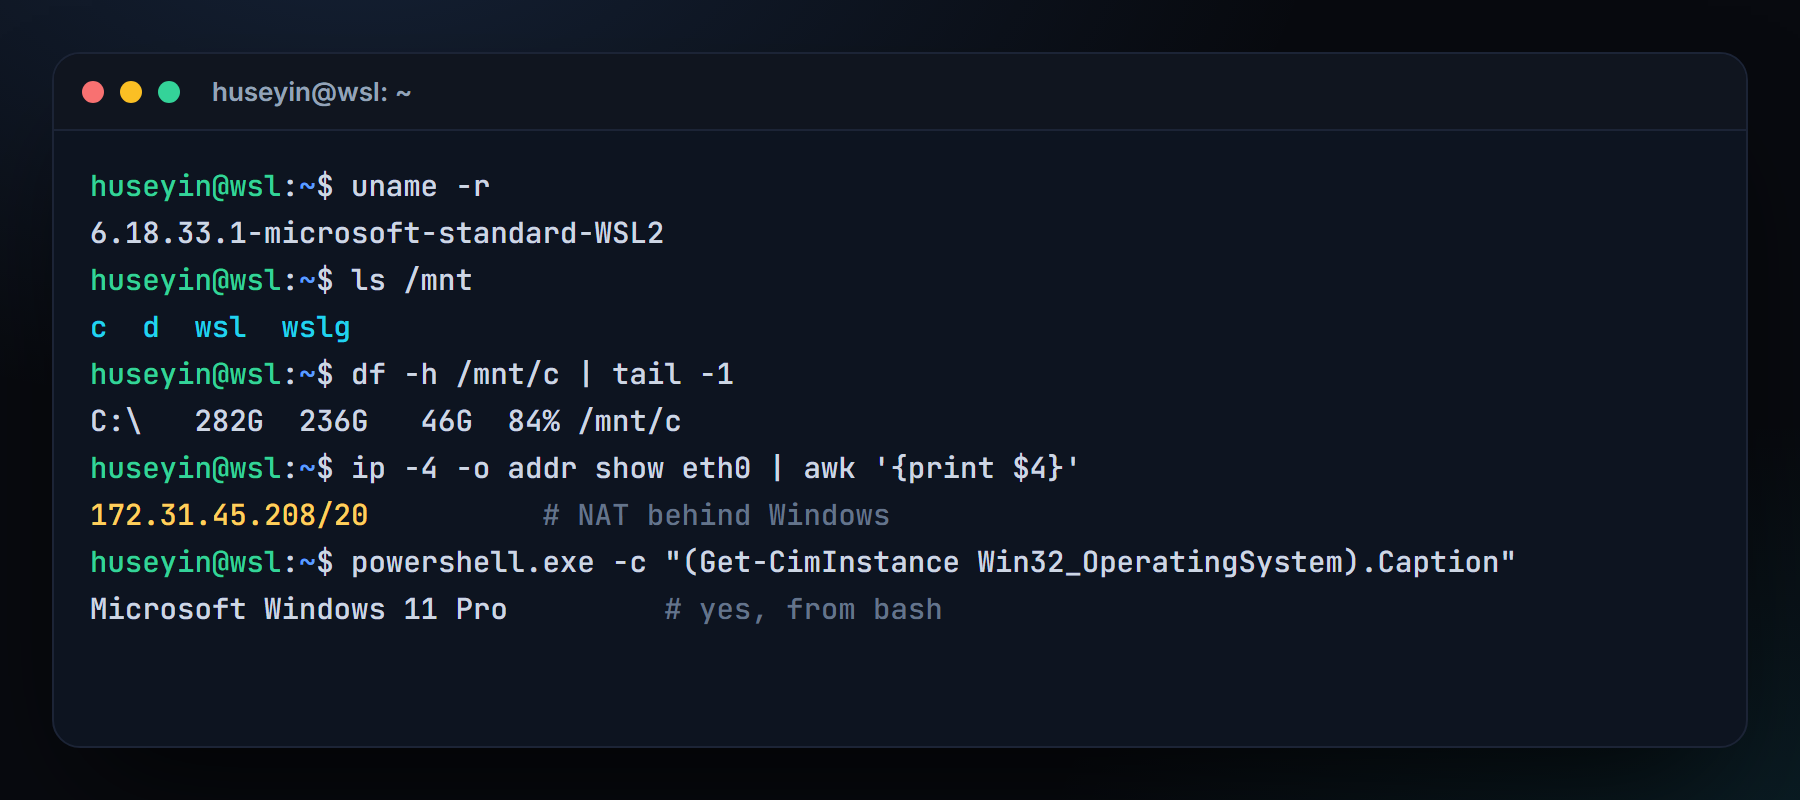
/mnt, and Windows programs callable from bash.- Windows files from Linux: the
C:\drive lives under/mnt/c. - Linux files from Windows: type
\\wsl.localhost\kali-linuxinto the Explorer address bar, or runexplorer.exe .from Linux. - Programs both ways:
powershell.exeornotepad.exefrom bash;wsl nmap -sV 10.10.10.5from PowerShell.
The real trap for security folks: networking
Look at the 172.31.45.208 address in the image. By default WSL 2 lives in its own small NAT network behind Windows. Connecting out is fine, but incoming connections (reverse shells!) do not reach WSL.
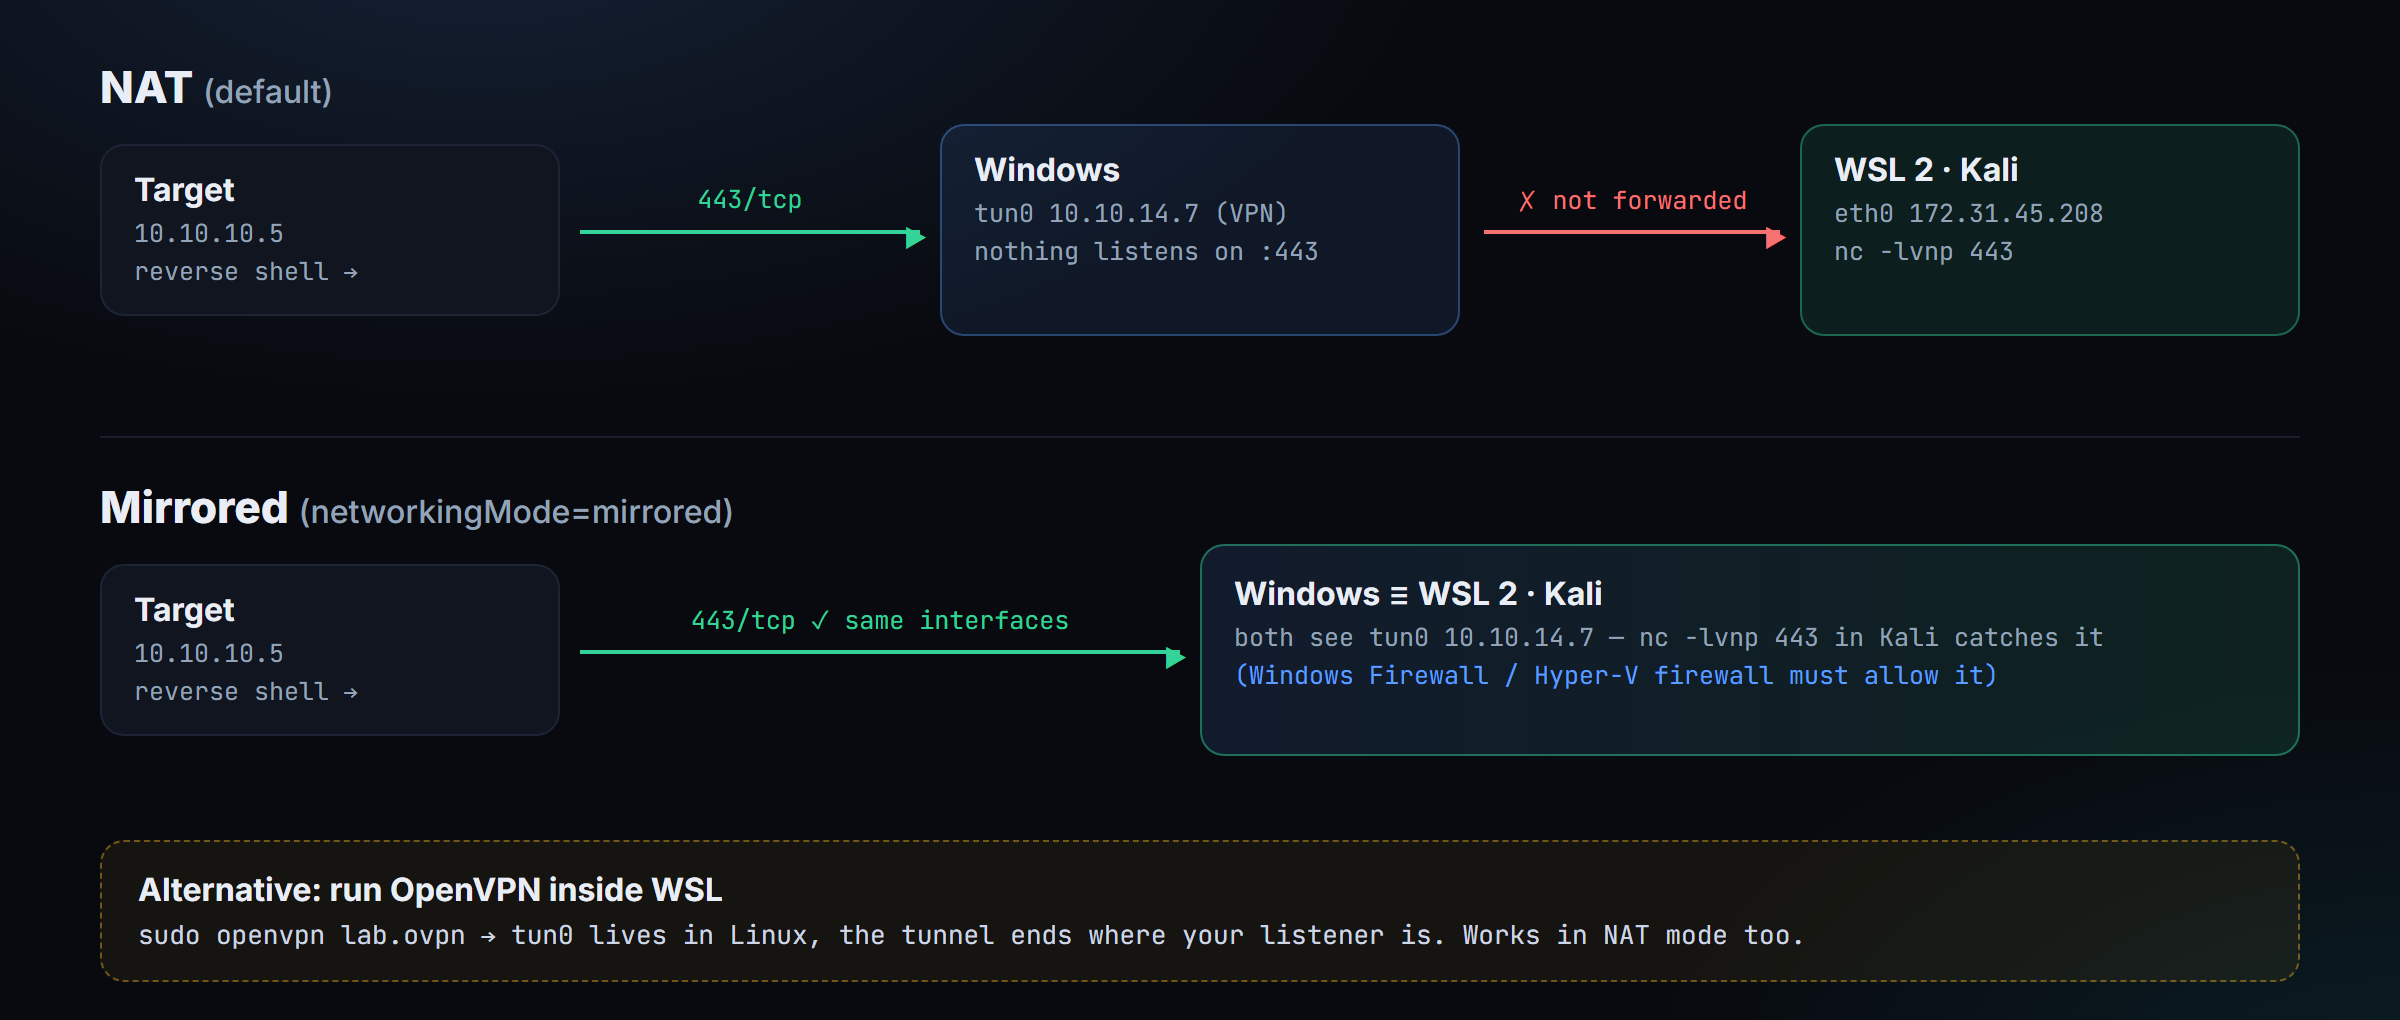
The classic scenario: you start the HTB/PG VPN on Windows, listen with nc -lvnp 443 in Kali, give the target your VPN IP as LHOST… and nothing arrives. The connection hits Windows, nobody listens there, and it is dropped. There are two clean fixes:
Fix 1: run the VPN inside WSL
sudo apt install -y openvpn
sudo openvpn lab.ovpn          # tun0 now lives in Linux
ip -4 addr show tun0           # use this IP as LHOST
The tunnel ends where your listener is, so this works even in NAT mode. It is the path with the least configuration.
Fix 2: mirrored networking mode
On Windows 11 you can let WSL use Windows' network interfaces as they are. Create %UserProfile%\.wslconfig in your user folder:
[wsl2]
networkingMode=mirrored
memory=6GB        # optional: RAM cap for WSL
processors=4      # optional
Then stop WSL with wsl --shutdown and start it again. Kali now sees Windows' tun0 address too. Incoming connections can be blocked by the Hyper-V firewall; instead of opening everything, allow only your listener port (administrator PowerShell):
New-NetFirewallHyperVRule -Name WSL-443 -DisplayName "WSL reverse shell 443" `
  -Direction Inbound -VMCreatorId '{40E0AC32-46A5-438A-A0B2-2B479E8F2E90}' `
  -Protocol TCP -LocalPorts 443
Shortcut: in labs, Fix 1 gives the fewest surprises. Mirrored mode is nice when you want tools on Windows (for example the Windows build of Burp) and WSL on the same network.
Small but sweet tweaks
- Keep your working files on the Linux side (
~/). File operations through/mnt/care noticeably slower, and keeping exploits and payloads in Windows folders invites Defender to "find" and delete them. - When things get weird:
wsl --shutdown. It is WSL's version of rebooting the computer, and it takes two seconds. - Make Kali the default profile in Windows Terminal; tabs and split panes are comfortable even if you are not used to tmux.
- Use VS Code with the WSL extension: type
code .in a Kali folder and the editor opens on Windows while files and the terminal stay in Linux. - Back it up:
wsl --export kali-linux kali-backup.tarstores the whole install in one file, andwsl --importrestores it on another machine.
Where WSL is not enough
- Wireless testing: using a Wi-Fi adapter in monitor mode means passing USB into WSL (
usbipd-win) and building the right driver. A separate Kali install or VM is less hassle for this. - Exam environment: for exams like the OSCP, the environment OffSec recommends is a Kali virtual machine. Think of WSL for daily work and labs; you do not want surprises on exam day.
- Corporate devices: EDR and company policy may restrict or monitor WSL. Check the rules before using it on a work laptop.
Cheat card
| You want to | Command |
|---|---|
| Install Kali | wsl --install -d kali-linux |
| List distributions and versions | wsl -l -v |
| Restart WSL | wsl --shutdown |
| Open Linux files in Explorer | explorer.exe . |
| Get reverse shells to arrive | VPN inside WSL, or networkingMode=mirrored |
| Back up the install | wsl --export kali-linux kali.tar |
WSL answers "Linux or Windows?" with "both". Once you have solved the networking trap, most of the work, from daily pentest notes to lab machines, happens on one computer without rebooting. If you are preparing for the OSCP, you will find most of these commands in the exam workflow of the OSCP Ultimate Guide.